Keel Sump Rebuild

Evelyn boats built by Performance Yachts or C&C, discuss issues and solutions. Get great feedback from owners, past owners and even some the people that built and designed them.

Moderator: Pterobyte

Keel Sump Rebuild

Postby muchmsw » Wed Feb 01, 2012 5:30 pm

Hi all;

I'm soliciting advice about rebuilding the keel sump on my E 32-2, Zingarella. The back
story is that I purchased the boat late last year, knowing that the keel sump
had a delaminated area on the port side, at the trailing edge of the keel.

Once I started to grind out the delam'ed part, I ended up removing a big
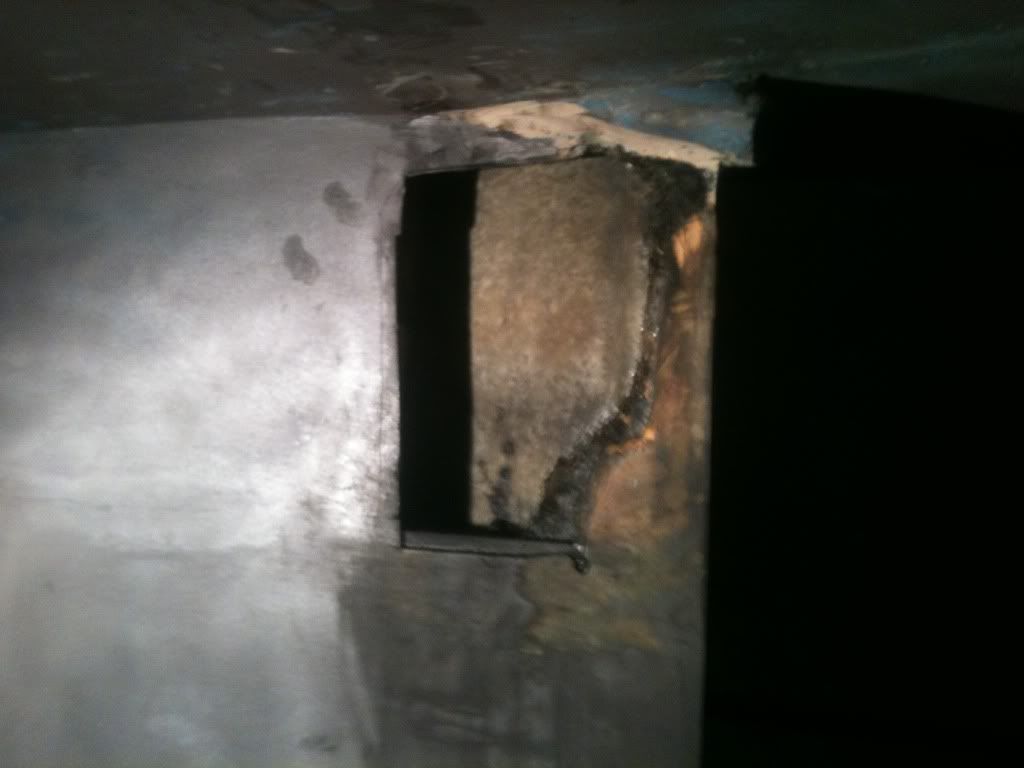
section of the sump, and exposed a hollow area at the rear of the sump, that was
filled with rotted synthetic (not balsa) core, diesel fuel, and water. Here's a
couple of pictures of the hole:
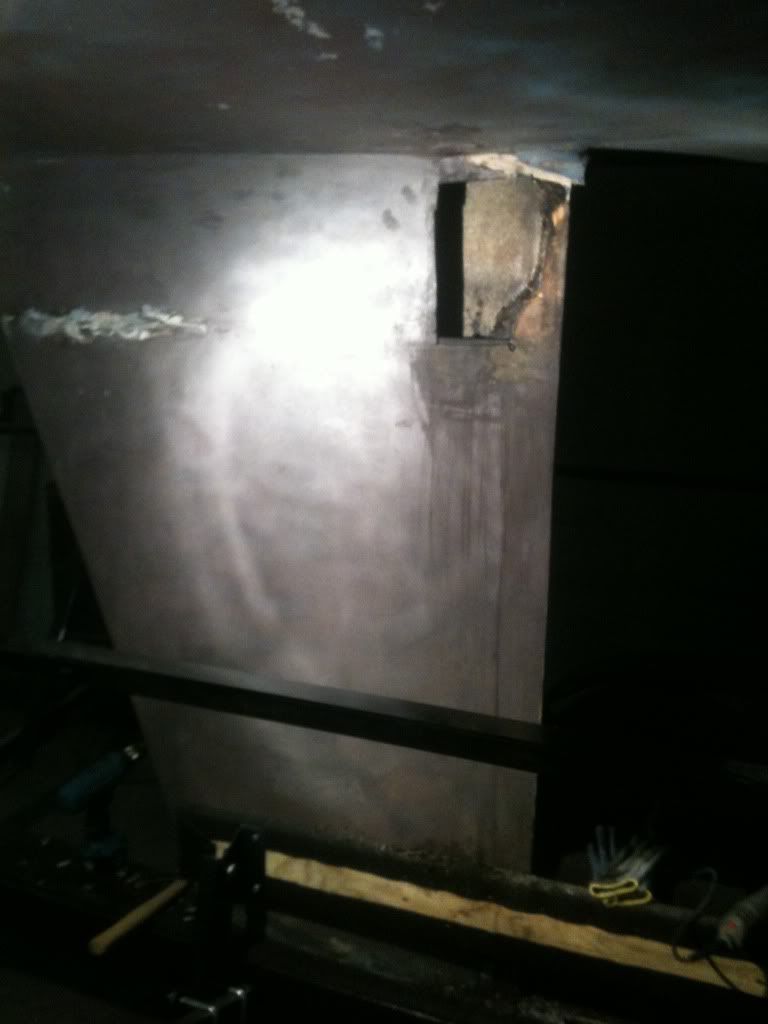
Image

a bit closer:

Image

I've filled the hole with divinylcell foam core sandwiched with epoxy reinforced biaxial mat, and
will finish it off with 10oz mat on the surface.

My concern is how to reinforce the rest of the keel sump. I have 4 internal stringers, but I'd
like to beef up the sump itself. My plan of action was to sand off all the baltoplate (that stuff is
a bear to remove) down to bare gellcoat and reinforce from the lead part of the keel up to the
hull with a layer of carbon mat and epoxy. Once I have the sump to keel joint reinforced,
I had planned to then fair the keel with West 407/epoxy, then barrier coat, then bottom paint.

Any opinions? My concern is that the mixture of water/diesel/freezing that caused the
delamination in the first place may have compromised the integrity of the sump and I'd like
to beef it up using carbon fiber to maximize strength while minimizing buildup on the sump
to attempt to keep the proper shape on the foil.

TIA,
Steve
muchmsw
Contributor
 
Posts: 20
Joined: Mon Jun 27, 2011 6:20 pm
Location: Chicago, IL

Re: Keel Sump Rebuild

Postby Pterobyte » Thu Feb 02, 2012 2:18 pm

I think you are on the right track. However I would not reinforce this from the outside. I would do your reinforcing inside the keel box.

If you really want to do it on the outside use a planer to make room for your carbon. This will help ease your fairing job after. Also I have used West 410 for fairing, just be sure you cover it with resin and barrier coat. If you want it harder you can mix in some 407. They are all compatible.

keel-small.jpg
Before
keel-small.jpg (10.13 KiB) Viewed 5771 times

keel2-small.jpg
After
keel2-small.jpg (10.86 KiB) Viewed 5771 times
Pterobyte
32132 Hull# 1
User avatar
Pterobyte
Loquacious
 
Posts: 189
Joined: Wed Sep 03, 2008 7:37 am
Location: USA

Re: Keel Sump Rebuild

Postby muchmsw » Fri Feb 03, 2012 2:21 pm

Pterobyte wrote:I think you are on the right track. However I would not reinforce this from the outside. I would do your reinforcing inside the keel box.


Actually, this makes the most sense. I can strengthen the sump to hull
transition with new reinforcement. The curves on the inside are easier
to deal with than the sharp hull/sump transition on the exterior.

It does involve removing old sump reinforcement,
which means more fiberglass grinding. Not my favorite activity! Grrr...

I guess I'll just bite the bullet and buy more respirator cartridges and grinding
attachments...

However, I was able to finish the glassing part of fixing the hole in the keel sump. You
can see the new foam core underneath the glass:

keel_fixed.jpg


All that's left on the exterior of the keel is sanding to remove the baltoplate and fairing.

Steve
muchmsw
Contributor
 
Posts: 20
Joined: Mon Jun 27, 2011 6:20 pm
Location: Chicago, IL

Re: Keel Sump Rebuild

Postby Rolf » Fri Feb 03, 2012 3:09 pm

Pterobyte wrote:I think you are on the right track. However I would not reinforce this from the outside. I would do your reinforcing inside the keel box.

If you really want to do it on the outside use a planer to make room for your carbon. This will help ease your fairing job after. Also I have used West 410 for fairing, just be sure you cover it with resin and barrier coat. If you want it harder you can mix in some 407. They are all compatible.

keel-small.jpg

keel2-small.jpg


Jim . . . Wow!!

That's a big gap you had to fill in the "before" picture. How many gallons of epoxy and cabosil did it take?
The "after" picture is beautimous.

rolf
Rolf
Contributor
 
Posts: 29
Joined: Tue Nov 17, 2009 5:52 pm

Re: Keel Sump Rebuild

Postby Pterobyte » Fri Feb 03, 2012 5:00 pm

That's funny. No, that was a complete separation of the keel. Yes, they come off.

I lowered the keel to rework the joint. The keel seemed loose so I dropped, err, lowered it, rebuilt the matting surface both inside the box and below the box. It was a arduous process. I epoxied the outside bottom of the keel box, with 404, greased up the matting surfaces and bolts and assembled the keel/box. Then I separated it again exposing a perfectly square and sound joint and then resembled it with 5200. In a like manner I laid a new 1/4 SS backing plate, that I fabricated, into the keel box.

See this post: http://nbayracing.com/Evelyn32-2Forum/viewtopic.php?f=8&t=66&start=15#p397

This was just the beginning because I totally re-faired the keel bringing it back to proper templates.

I spent many many hours underneath this boat sanding fairing caressing. The wife was beginning to think there was some erotic objectophilia going on.
Pterobyte
32132 Hull# 1
User avatar
Pterobyte
Loquacious
 
Posts: 189
Joined: Wed Sep 03, 2008 7:37 am
Location: USA

Re: Keel Sump Rebuild

Postby muchmsw » Fri Feb 03, 2012 6:24 pm

Pterobyte wrote:The wife was beginning to think there was some erotic objectophilia going on.


Heh. There is something truely sexy about the hull of a racing sailboat...

Steve
muchmsw
Contributor
 
Posts: 20
Joined: Mon Jun 27, 2011 6:20 pm
Location: Chicago, IL

Re: Keel Sump Rebuild

Postby muchmsw » Fri Feb 03, 2012 6:55 pm

Pterobyte wrote:This was just the beginning because I totally re-faired the keel bringing it back to proper templates.


How did you make your keel fairing templates?

Rick Loheed (PO, "fastcrab") kindly generated a PDF of the offsets for me, and I had them
printed on a flatbed printer at Kinko's, and then cut them out and traced them onto luan
plywood and started to cut them out using a reciprocating saw.

Needless to say, the curves I generated are less than pristine and I'd like to figure out
a way to make a good set.

Did you purchase a Compukeel kit?

Steve
muchmsw
Contributor
 
Posts: 20
Joined: Mon Jun 27, 2011 6:20 pm
Location: Chicago, IL

Re: Keel Sump Rebuild

Postby Pterobyte » Sat Feb 04, 2012 8:59 pm

muchmsw wrote:
Pterobyte wrote:This was just the beginning because I totally re-faired the keel bringing it back to proper templates.


How did you make your keel fairing templates?

Did you purchase a Compukeel kit?

Compukeel; I laminated these onto 1/2 plywood. I cut them out on a band saw and sanded them smooth. The dilemma was to build the keel up up to one set or grind down to another. I initially was going to build it up until. But on inspection i found I would have to lay down way way too much so I went down one line. Let me know what draft you end up with too.

P1010115.JPG
Compukeel
Pterobyte
32132 Hull# 1
User avatar
Pterobyte
Loquacious
 
Posts: 189
Joined: Wed Sep 03, 2008 7:37 am
Location: USA

Re: Keel Sump Rebuild

Postby muchmsw » Tue Feb 07, 2012 4:24 pm

Jim;

Thanks for the info on your templates from Compukeel.

Could you drop me a line at my email: muchmsw@gmail.com? I
had a question to ask.

Thanks,
Steve
muchmsw
Contributor
 
Posts: 20
Joined: Mon Jun 27, 2011 6:20 pm
Location: Chicago, IL


Return to Fixes and Repairs on Evelyn 32

Who is online

Users browsing this forum: No registered users and 2 guests

cron